Wrapping Tutorials
White Bouquet Shell Tutorial: Burgundy Ribbon Lacing
Oct
Last updated:
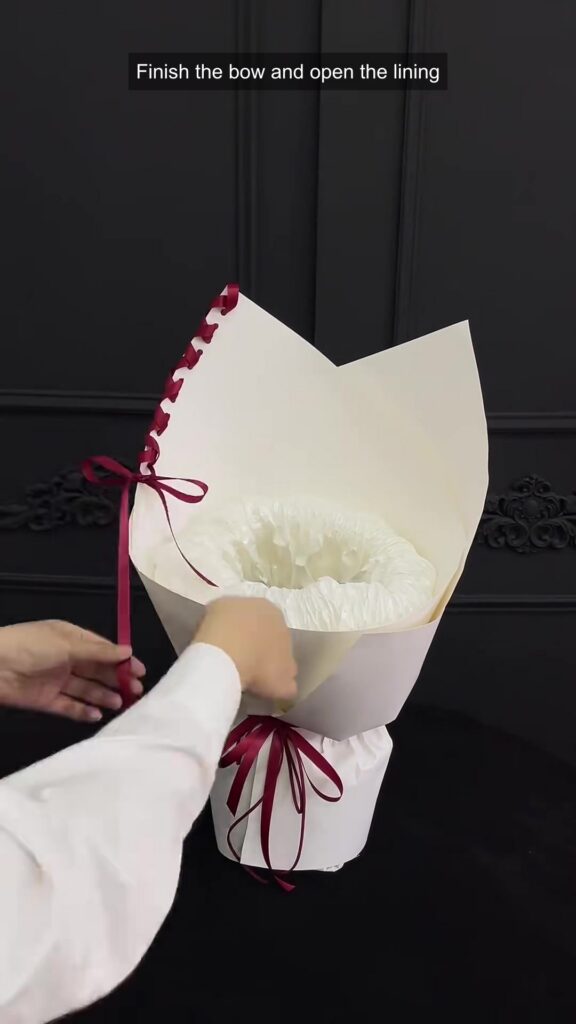
A narrow ribbon can turn a plain wrapping edge into the main detail of a bouquet shell. In this 37-second demonstration, a soft white lining sits inside pointed cream-white outer paper, while burgundy ribbon follows a row of holes along one side. The florist works around a cardboard support rather than arranging flowers, making the order of the wrapping layers easy to see.
Materials shown in the demonstration
- Soft white inner wrapping paper, gathered to make an open lining.
- Cream-white outer wrapping paper with pointed upper corners.
- Narrow burgundy ribbon for the edge lacing and a ribbon finish at the grip.
- A demonstration support or your own prepared bouquet, plus a suitable fastening method for the lower paper.
- A prepared row of holes along one outer edge; making these holes is not demonstrated in the clip.
Follow the visible steps
- 00:00–00:10 — Gather and open the inner layer The demonstrator gathers the soft white paper around a cardboard support, building a raised inner collar before opening its upper edge. Keep the lower section together while spreading the lining at the top. The purpose of this stage is to make a visible inner border and an open center; the support itself is a teaching aid rather than a flower arrangement.
- 00:10–00:16 — Add the pointed outer shell Place the lined support on the cream-white outer paper and bring the paper around it. The overlapping sections make the pointed top visible in the finished front view. Adjust the overlap before securing the grip, checking that the white inner collar remains visible inside the shell. The clip does not supply a measured template, so test the sheet size against your own bouquet.
- 00:16–00:24 — Secure the grip and add the lower ribbon Bring the lower paper together around the grip and secure it. The demonstrator then ties burgundy ribbon around this gathered area. Keep the upper opening relaxed while tightening the lower wrap so the paper does not pull inward. Leave the finish comfortable to hold, and adjust it to the actual weight and stem bundle of the bouquet you intend to wrap.
- 00:24–00:32 — Lace the ribbon along one edge With the shell upright, thread the narrow burgundy ribbon progressively along the existing line of holes on one outer edge. The repeated loops create a contrasting decorative border against the pale paper. Work along the row without pulling so hard that the paper puckers or the holes tear. The preparation of the holes is outside the shown process; test your paper and spacing on a spare piece first.
- 00:32–00:37 — Finish the small bow and reopen the lining Finish the laced edge with a small ribbon bow, then gently open the soft inner layer. Check the shell from the front: the pointed paper, ribbon border and lower bow should each remain visible. This final adjustment restores the open shape after handling the edge. The video stops with the empty shell, so adding flowers and their water containment are separate steps.
Adapt the shape to your bouquet
For a larger bouquet, check the opening and grip against the actual flowers before fixing the outer overlap. Preserve enough room for the flower heads and use the lining to frame them without pressing against delicate petals. If the ribbon detail sits on the viewing side, keep that edge clear of overlapping paper. A small mock-up is useful when changing the sheet size or the position of the decorative row.
Choose paper and ribbon for the laced edge
The visible contrast comes from soft white lining, a smoother pale outer shell and narrow dark red ribbon. A laced edge needs paper that tolerates the intended holes and handling; appearance alone does not establish its strength or water resistance. Test the hole placement and ribbon tension with your actual materials. The clip does not identify a verified paper composition, ribbon fiber, product SKU or exact cutting dimensions, so use the demonstration as a sequence reference rather than a complete specification.
Compare material options in the wrapping paper, lining paper and ribbon collections. These are related material categories; a specific listed product is not identified from the video.
The Instagram tutorial
Watch the same demonstration on FAFAFLOWER’s Instagram.
More wrapping references
Compare the panel order in our lavender layered wrapping tutorial, or read What Paper Do Florists Use? for material selection.
Original tutorial by 万物皆可包 on Xiaohongshu, shared with permission. Original design and footage remain credited to the creator; FAFAFLOWER added the English visual steps. These written notes describe the visible process and are not a verbatim audio transcript.
