Wrapping Tutorials
Floral Print Bouquet Shell Tutorial: White Layers and a Green Ribbon
Oct
Last updated:
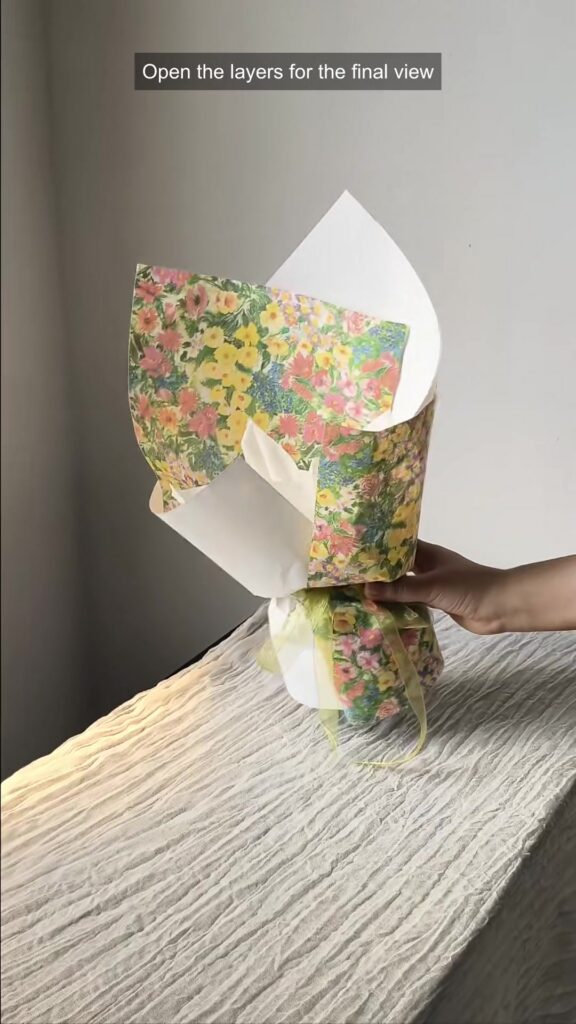
This floral print bouquet shell tutorial shows how pale printed paper can remain visible between white wrapping layers. The demonstrator starts with an already-covered support, adds a soft inner collar, and builds an open shell with staggered pointed panels. The final details are a neat covered grip and a narrow green ribbon. Watch the 84-second process, then follow the visible stages below.
Materials shown in the demonstration
- An already-covered demonstration support; for a real bouquet, prepare the stems and any required water containment separately.
- Soft white inner wrapping paper that can be folded, gathered and opened into an inner collar.
- Floral-print outer paper and plain white outer paper for contrasting panels.
- A small piece of matching printed paper for the lower finish and green ribbon.
- Scissors and a suitable fastening method; tape and its dispenser are visible during the demonstration.
Follow the visible steps
- 00:03–00:14 — Lay out the support and paper The video introduces the small covered support, soft white lining, floral-print paper and plain white outer sheet. Lay the components out before beginning so the lower fastening point is easy to reach. The support is already prepared at this stage; the clip does not establish its exact dimensions or show a complete water-containment method for fresh flowers.
- 00:14–00:28 — Fold and gather the soft white lining Fold the soft white sheet, gather its lower section and open the top into several visible points. This creates the light inner collar that remains visible throughout the finished shell. Keep the folds loose enough to open rather than compressing the upper edge into one narrow point. Check the collar from the front before fixing it around the support.
- 00:28–00:34 — Position the collar around the center Bring the lining around the support and fasten its lower section. The upper points spread out around the opening while the grip stays compact. This is the foundation for the outer layers: if the collar leans to one side now, adjust it before adding the stiffer panels. An actual bouquet may require a different opening and grip size from the demonstration support.
- 00:34–00:50 — Place the floral-print panels The demonstrator divides the printed sheet and brings the prepared sections around the lining. Their corners rise above the center at different heights. Keep enough printed surface visible to show the pattern; avoid aligning every upper edge into a single straight line. Make small adjustments at the lower overlap before securing each section.
- 00:50–01:08 — Frame the pattern with white layers White outer paper is cut and added around the printed layer. Smaller front and side sections continue the alternating outline without closing the middle. Work around the shell while checking both the white border and the exposed print. The clip is a visual sequence rather than a measured cutting template, so test the proportions with your own sheet size.
- 01:08–01:24 — Finish the lower section and ribbon Check the open shell from both sides, then cover the lower area with matching printed paper. The demonstrator adds green ribbon and opens the upper layers for the final view. Keep the lower fastening secure while allowing the upper points to stand apart. The finished example contains the support rather than flowers, so fitting it to a stem bundle is a separate final adjustment.
Adapt the shape to your bouquet
Use the actual bouquet to judge the opening before fixing the outer panels. A narrow bouquet may need less paper overlap and lower front corners; a wider bouquet needs room for the flower heads without pressure from the pointed edges. Test a small paper mock-up when changing the proportions. Do not infer exact cutting measurements from the scale of the demonstration support.
Balance floral print with plain white paper
The visual contrast comes from a small floral pattern, a soft white collar and larger plain white outer sections. Choose which printed areas you want to remain visible before placing the front panels. Paper with a different stiffness or drape may need another overlap or fastening position. Appearance and the original caption do not by themselves verify composition, water resistance, storage life or a specific item in the shop; check the actual material specifications when choosing your supplies.
Compare material options in the wrapping paper, lining paper and ribbon collections. These are related material categories; a specific listed product is not identified from the video.
The Instagram tutorial
Watch the same demonstration on FAFAFLOWER’s Instagram.
More wrapping references
Compare the panel order in our lavender layered wrapping tutorial, or read What Paper Do Florists Use? for material selection.
Original tutorial by 花间小憩 on Xiaohongshu, shared with permission. Original design and footage remain credited to the creator; FAFAFLOWER added the English visual steps. These written notes describe the visible process and are not a verbatim audio transcript.
