Wrapping Tutorials
Individual White Paper Cones for a Colourful Birthday Bouquet
Nov
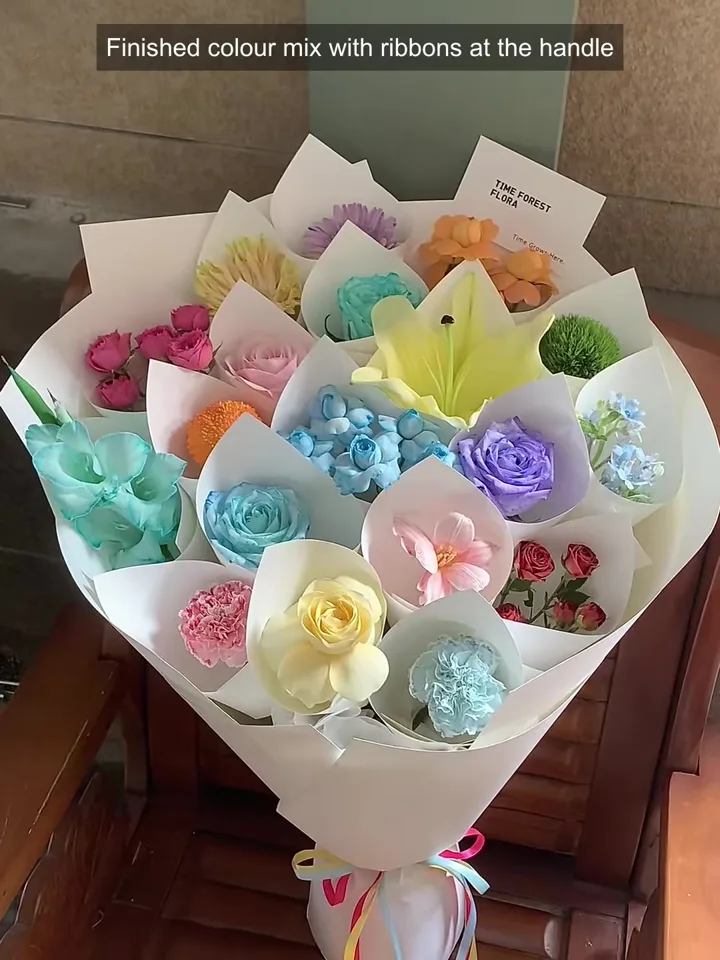
Small white paper cones separate the colours and shapes in this birthday bouquet. Each wrapped floral unit has a visible white edge, while a broad outer wrap brings the group together. Watch the cones being arranged upright before the larger paper layers are added, then compare the small inner openings with the final outside rim.
Open the original Reel on Instagram
0:04–0:13 · Prepare the small wrappers as a separate stage
White sheets and already-shaped cones are set out on the table. Their open upper edges and narrow lower ends establish the repeated shape that will appear throughout the bouquet. The clip moves quickly through this preparation and does not provide a complete measured cone-folding template.
For your own sample, compare a trial cone with the actual flower or small cluster it will surround. Decide how much white edge you want visible around that unit before preparing the rest.
0:13–0:34 · Compare the flower faces within the white edges
Close views show different colours and silhouettes: rounded faces, smaller clusters and more open shapes. The following views show these floral units inside separate white cones, laid out beside one another.
Use that laid-out stage to compare your colour mix before grouping it. Check the largest open shape beside the smaller rounded faces, then look at each cone opening. Keep enough of the flower visible for its colour and outline to read above the paper.
0:34–0:49 · Arrange the wrapped units upright
The presenter uses an upright working support while placing the cones into a taller arrangement. The group grows outward, with cones facing toward the front and different flower faces visible at several heights. The white rims remain separate within the group.
Check your own arrangement from the front and sides as you add each unit. Compare the flower faces with neighbouring cone points: a high paper corner can obscure a smaller flower behind it. Adjust the visible spacing and height before deciding on the outer wrap. Construction of the complete finished internal support is not demonstrated.
0:49–1:07 · Fit the broad white outer layers
Larger white sheets are brought around the grouped cones, with overlapping points at the upper edge and paper gathered below. The lower covering is adjusted as the arrangement is lifted and viewed upright.
For your version, compare the outer rim with the smaller cones before tightening the lower gather. Leave the individual white openings visible above the broad wrap. Check the sides as well as the front so the outside paper frames the group without covering the outermost flower faces.
1:07–1:11 · Review the finished colour mix
The closing reference shows narrow coloured ribbons at the handle. Their colours echo the varied flower faces above the white wrapping. Use the finished view to compare ribbon width and tail length with your own bouquet; the complete tying sequence is not shown.
Ask about white paper and coloured ribbon options
Choose “Other”. The optional note below can be copied into your inquiry.
Copy an optional cone paper inquiry
Individual White Paper Cones for a Colourful Birthday Bouquet. https://fafaflower.com/individual-white-paper-cones-colourful-bouquet/ White paper for small individual cones and a broad outer wrap, plus narrow coloured ribbon for our own bouquet. Floral-unit sizes, cone openings, outer sheet sizes and desired paper feel: [details]. Ribbon colours, width and tail lengths: [details]. Quantity and destination: [details]. Please advise available specifications, pack sizes and samples.
Reference demonstration: 时光森林TIME FOREST. Wrapping observations by FAFAFLOWER.
