Wrapping Tutorials
Burgundy Wedding Bouquet Shell: A Printed Liner and Gold Detail
Nov
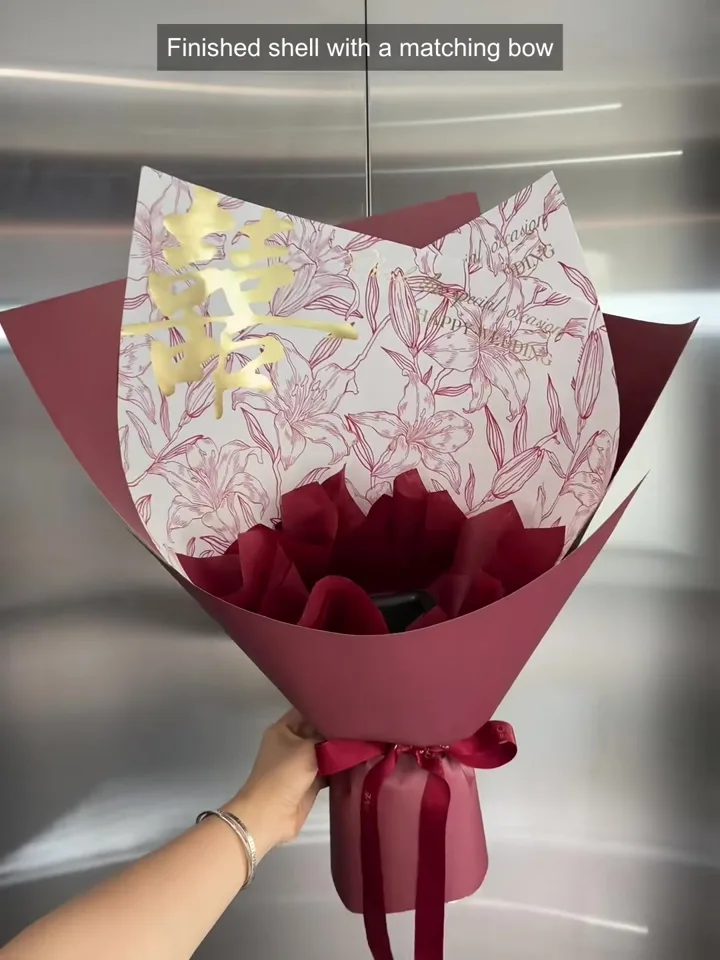
A pale liner with fine red patterning rises above a deep burgundy front panel. A large gold-coloured Double Happiness motif remains visible near the upper left, while burgundy corners frame the liner from behind. This demonstration builds an empty bouquet shell around a prepared base. Follow the paper placement below to plan the visible pattern and outer border for your own version.
Open the original Reel on Instagram
0:03–0:13 · Position the printed liner first
The presenter holds up the patterned sheet, then places it behind a base that already has burgundy inner folds and a pale lower covering. The printed face remains toward the viewer as the paper is brought around the base and gathered below.
When planning your own shell, choose a front view before making this fold. Check where the large motif will sit above the lower edge. Unlike a small repeating pattern, a large detail needs a clear area where later sheets will leave it visible.
0:13–0:21 · Add the burgundy side sheets
Burgundy paper is placed behind and around the sides of the lined base. Its corners project beyond the patterned sheet, creating darker points at the outside of the shell. The hands gather the paper at the same lower holding area.
Compare the exposed border on both sides before tightening your own wrap. Keep the patterned area open enough for the motif to read, and check that an outer corner does not fold across it.
0:21–0:31 · Cut and shape the front panel
A separate burgundy piece is trimmed with scissors and fitted across the front. Its upper edge forms a lower curve beneath the broad patterned area. The presenter checks the shell from another angle and adjusts the overlap.
Use this front-panel height as a design decision for your sample. Hold the piece against your prepared form before cutting further, then compare how much liner remains visible. The footage supplies a shape reference rather than a measured cutting template.
0:31–0:41 · Cover the handle and compare the finish
The lower burgundy paper is brought around the handle area and gathered. The final upright views show a matching bow with long tails below the narrow neck. Bow tying and preparation of the internal base are not demonstrated.
Check the finished silhouette as three areas: the patterned upper face, the lower burgundy front and the narrow covered handle. Review those proportions on your own practice shell before adapting it for flowers.
Compare flat panels with rolled crimson side points
A second wedding-shell demonstration uses a red panel with gold-coloured lettering and separately curled side pieces. Compare the silhouette with the patterned-liner version above: broad flat faces define the first shell, while open rolls project beside the printed panel in this one.
Open the rolled-side Reel on Instagram
0:03–0:19 · Set the printed panel and outer sheets. The presenter cuts the lower part of the gold-lettered panel and places it behind a prepared base. Plain crimson sheets are gathered around the sides, leaving the lettering visible above the inner folds. Preparation of the base is not shown.
0:19–0:29 · Curl the separate side pieces. A further sheet is cut, and the presenter turns the paper lengthwise into an open rolled shape before fitting it beside the base. Another curled piece is placed on the opposite side. Watch their wider upper openings and the narrower ends held at the gathering point.
0:29–0:41 · Fit the front and handle covering. Additional red paper covers the lower front and handle area. The closing reference shows ribbon and hanging tails; it does not provide a complete bow-tying lesson.
On your own sample, compare the rolled openings with the height of the printed panel before fastening the lower gather. Leave the gold detail visible and check the outline from both sides. For material samples, specify the red shade, print placement and the fold you intend to try; confirm paper handling on a sample rather than inferring it from the surface appearance.
Describe the liner and outer paper separately
For sample requests, give your planned shell size, burgundy shade, liner pattern, motif size and position, plus ribbon requirements. Confirm the available print and material specifications through samples.
Ask about patterned liners and burgundy wrapping
Choose “Other”. The optional note below can be copied into your inquiry.
Copy an optional liner and wrapping inquiry
Burgundy Wedding Bouquet Shell: A Printed Liner and Gold Detail. https://fafaflower.com/burgundy-wedding-bouquet-shell-printed-liner-gold-detail/ Patterned liner, burgundy outer paper and coordinating ribbon for our own shell. Planned shell and sheet sizes: [details]. Burgundy shade, pattern, motif size and position: [details]. Ribbon width, quantity and destination: [details]. Please advise available specifications, print options, pack sizes and samples.
Reference demonstrations: 眼镜花艺资材. Wrapping observations by FAFAFLOWER.
