Wrapping Tutorials
Polka-Dot Bouquet Shells: Patterned Interiors and Plain Frames
Nov
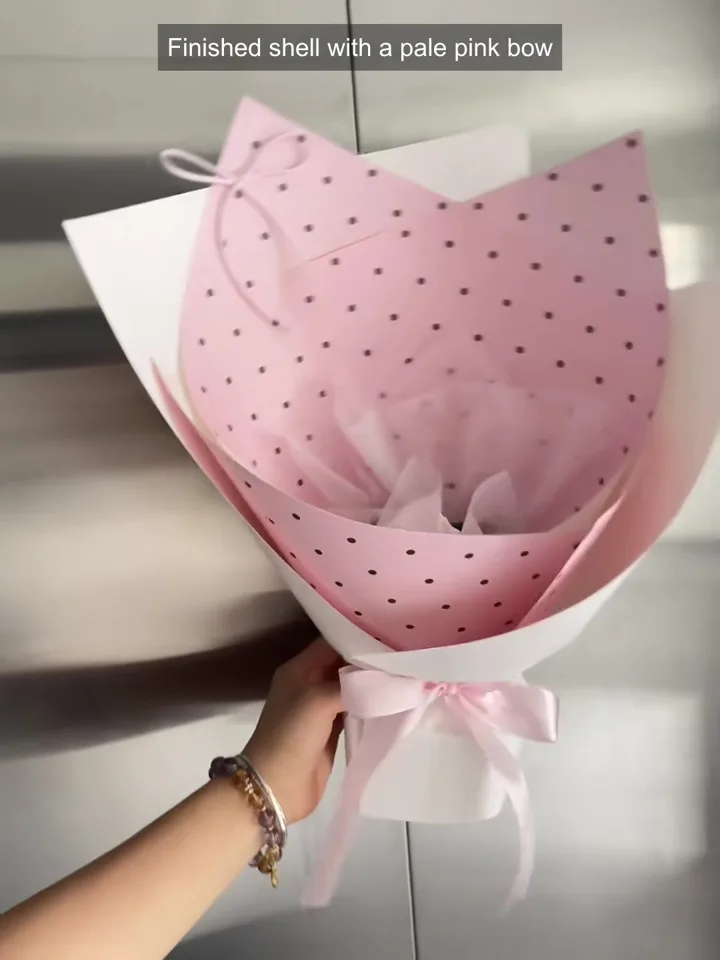
Where you place the patterned paper changes the way an empty bouquet shell reads. In one example, pink polka dots fill the tall inner section and the low front, with white paper forming the outside frame. In the second, a pale dotted back and front are separated by solid white and pale-pink side layers.
Compare the front opening, raised corners and plain border before planning your own paper combination. Both demonstrations start with prepared supports; neither shows their construction or flower insertion.
Pink dotted interior: use white paper as the outside frame
Watch the pink dotted shell demonstration on Instagram
0:03–0:16 · Set the taller patterned section
The presenter trims the pink dotted sheet and brings it around a small prepared form. The patterned corners rise above the form while the lower paper gathers at the grip. Keep track of those upper corners as the shell turns: they establish the tall part of the finished outline.
0:16–0:25 · Bring a second dotted piece across the front
Another pink sheet is brought across the opening and gathered below. Its curved upper edge sits lower than the back, so the same pattern appears on two levels. Before adding an outside layer to your own shell, compare the front edge with the upper corners and decide how much of that opening to retain.
0:25–0:37.6 · Add the white outside layers and cover the grip
White paper is shaped around the pink shell, followed by more white paper around its lower section. The finished view shows a plain white border outside the dotted front and a narrow white grip beneath it. Check the shell from the front as you fit each piece: the white layer can frame the pink area while leaving its curved edge visible.
The closing 0:37.6–0:40.1 reference shows a pale-pink bow. The clip does not demonstrate the complete bow-tying sequence.
Dotted back and front: separate the pattern with plain sides
Watch the dotted back-and-front comparison on Instagram
In this second example, the presenter cuts an opening in a pale dotted sheet at 0:04–0:08, fits it behind a prepared support and trims projecting front paper. White pieces are added at 0:16–0:30, followed by a pale-pink side layer at 0:30–0:40.
A separate dotted panel returns across the lower front at 0:40–0:48. Here the plain side areas interrupt the pattern between the tall back and low front. This gives you a different planning choice from the largely pink dotted interior in the first example.
Mark three areas before you cut
- Pattern: sketch the tall back and low front separately, even when both use the same paper.
- Plain paper: decide whether it forms a narrow outside border or broader visible side areas.
- Opening: mark the front edge below the upper corners, then test the overlap around your own prepared form before trimming.
Describe the paper combination for your own shell
For a sample request, specify the dotted paper colour and pattern, the plain outside or side colours, and your planned shell and sheet dimensions. Add the ribbon colour and width separately. These videos establish the visible layer arrangements; they do not establish paper composition, dimensions or a particular product specification.
Ask about dotted paper, plain wrapping and ribbon
Choose “Other”. The optional note below can be copied into your inquiry.
Copy an optional paper and ribbon inquiry
Polka-Dot Bouquet Shells: Patterned Interiors and Plain Frames. https://fafaflower.com/polka-dot-bouquet-shells-pattern-plain-layer-placement/ Dotted paper and plain wrapping for our own empty bouquet shell. Pattern placement, colours and intended shell/sheet dimensions: [details]. Ribbon colour and width: [details]. Quantity and destination: [details]. Please advise specifications, pack sizes and sample availability.
Reference demonstrations by 眼镜花艺资材. Layer-placement observations by FAFAFLOWER.
