Wrapping Tutorials
Yellow Bouquet Tutorial: Greenery, White Accents and Warm Paper Layers
Oct
Last updated:
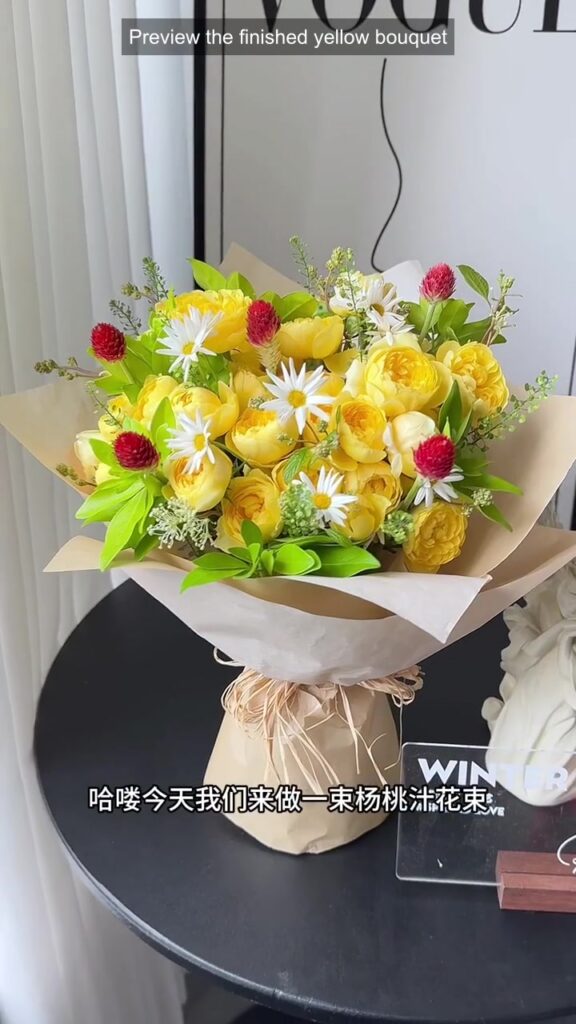
This yellow bouquet tutorial follows the visible order of a hand-held arrangement: build the yellow center, add fine green details and broader leaves, then use white and red accents to separate the flower faces. The clip begins with a finished preview before showing the materials and assembly. Its final paper wrapping is brief, so the stages below describe what is visible without adding a missing cutting pattern or detailed knot lesson.
Materials shown in the demonstration
- Yellow flower stems with rounded open faces; exact varieties and quantities are not verified
- Fine branching green material and broader green leaves
- Small white flower faces and red round accents
- Clear material used around the lower stem area; specification and sealing method are not established
- Warm brown and pale paper layers, scissors and a natural-colored fine finishing tie
Follow the visible steps
- 00:00–00:10 — Preview the bouquet and prepare the materials The first views show the finished bouquet and the visible WINTER FLORA studio mark. The maker then lays out yellow flowers, green materials and smaller accents. Use these views to distinguish the broad flower faces from the finer green texture. The demonstration does not give measured quantities or a paper-cutting template.
- 00:10–00:18 — Build the yellow flower center Yellow stems are gathered in the hand and added to the initial group. Their faces sit close enough to read as one bright area. The hand partly covers the grip, so this is a visual sequence rather than a measured demonstration of stem angles.
- 00:18–00:28 — Add the fine green outline Fine green stems are placed around and between the yellow faces. The bouquet turns as the maker compares the sides. Watch the green tips extend beyond the flower faces while the central yellow area stays visible.
- 00:28–00:38 — Add leaves, white faces and red accents Broader green leaves provide a different shape from the fine filler. Small white flower faces and round red accents break up the yellow grouping. The later turns show how these details look together; individual placements are not all shown at the same level of detail.
- 00:38–00:45 — Gather the wrapping layers The lower clear wrap and warm brown paper appear in a short sequence. Scissors are shown at the paper, followed by brown and pale layers gathered around the grip. The finishing tie is quick. Do not treat this section as a complete sealing, cutting or bow-tying lesson.
- 00:45–00:47 — Compare the finished outline The final views show the yellow center, green outer texture and small white and red accents above the paper. Compare the edge of the wrapping with the green outline and retain the original studio mark in any reused footage.
Compare broad faces with fine texture
The larger yellow faces provide the central color, while fine green tips keep the edge light. Broader leaves add a second green shape and the white and red details punctuate the grouping. Study the turns of the bouquet before changing the amount of any one material in your own arrangement. The clip offers a useful order of assembly, rather than a fixed stem count.
Choose materials from their actual specifications
The footage does not identify a catalogue SKU, a tested wrapping performance or a universal paper size. The maker’s original captions name a paper, but this guide describes its visible warm brown color without inferring its composition or water resistance. Select paper, clear wrapping and finishing ties using the specifications for the materials you actually have.
The Instagram tutorial
Watch the same demonstration on FAFAFLOWER’s Instagram.
More wrapping references
Compare the panel order in our lavender layered wrapping tutorial, or read What Paper Do Florists Use? for material selection.
Music: “Acoustic Guitar #1” by Jason Shaw / Audionautix — source. Licensed under CC BY4.0. Changes: Excerpt, fades and level adjustment.
Authorized florist demonstration; the visible WINTER FLORA mark is retained. Original design and footage remain credited to the creator; FAFAFLOWER added the English visual steps. These written notes describe the visible process and are not a verbatim audio transcript.
