Wrapping Tutorials
Orchid Spray Shaping Tutorial: Small Heart-Shaped Wire Supports
Oct
Last updated:
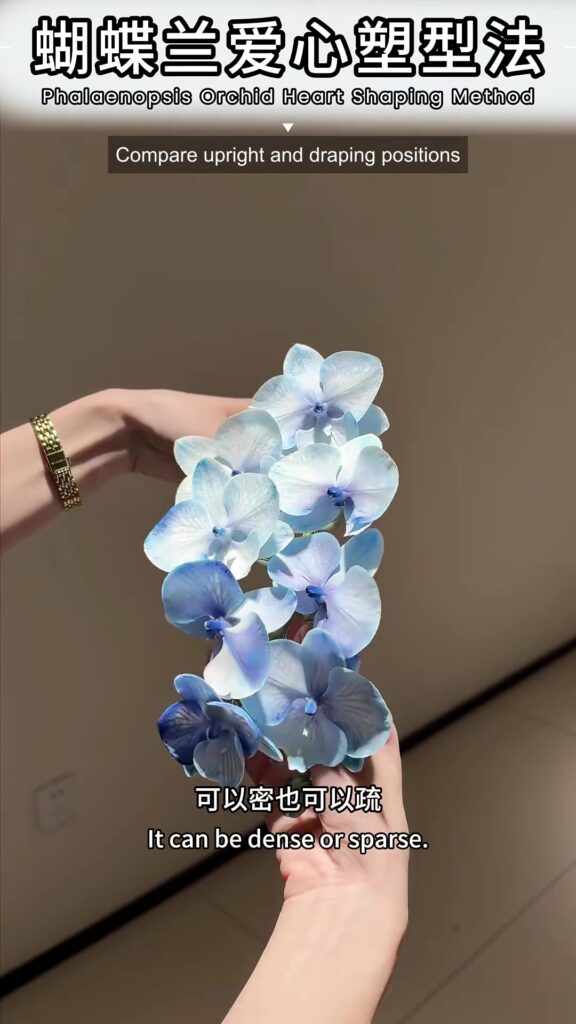
This orchid spray wire support tutorial demonstrates a small construction detail that changes how individual flowers can be positioned. The maker forms wire into tiny hearts, places each loop behind a flower face and secures the tail near the stalk bend. The heart describes the support shape; the finished flower spray itself is not arranged as a large heart. Watch the complete demonstration and compare the visible stages below.
Materials shown in the demonstration
- A cut orchid spray, identified as Phalaenopsis in the creator’s on-screen title
- Thin bendable wire; the source captions describe aluminum wire, while exact product specifications are not independently verified
- Pointed pliers and a cutting tool
- Small strips of tape used to fix each support to the flower stalk
Follow the visible steps
- 00:00–00:16 — Compare the spray and prepare the wire The opening shows an orchid spray with visible gaps between its flower faces. The maker introduces a coil of thin wire, measures a short length against the hand and cuts a section. The source captions describe one-millimeter aluminum wire, but the hand comparison is not a reliable cutting measurement. Choose wire by its actual specifications and by the size of the individual flowers being supported.
- 00:16–00:39 — Make the small heart-shaped loop The wire is folded into a U, then crossed and twisted near the base of the loop with pointed pliers. The ends are trimmed and the upper curve is divided into two rounded lobes. A small heart is visible at the top, with a longer tail extending below it. Compare the symmetry and size with one flower face rather than treating this as a large decorative heart for the bouquet outline.
- 00:40–01:08 — Place the support behind a flower The maker brings the heart loop behind an individual flower, close to the base of its face. The longer tail follows the flower stalk downward. Watch both hands: one holds the flower while the other aligns the wire. A short piece of tape is prepared before the support is fixed. Several views are close-up; the clip does not provide a universal support size or a measured pressure setting.
- 01:08–01:29 — Secure the tail near the bend Tape fixes the wire tail at the bend in the individual flower stalk. The support remains behind the flower face while the lower section follows the stalk. The maker repeats the adjustment and checks how neighboring flower faces sit together. The aim shown is control of spacing and orientation; the video does not test stem longevity or establish that every orchid spray will behave the same way.
- 01:30–01:54 — Compare the front and back The supported portion is held beside a less-adjusted area to compare spacing. The spray is then turned over, revealing separate small heart-shaped supports behind individual flowers. Use that back view to understand the construction: the wire is not shown reshaping the entire main stem into a heart. Recheck the front after each support so the arrangement still reads as one connected spray.
- 01:54–02:05 — Consider upright and draping placement The final views show the adjusted spray held upright and in a more downward orientation. The creator also compares denser and looser flower spacing. The clip ends with the flower spray held in the hand; it does not demonstrate a complete bouquet, wrapping sequence or final container installation. Plan those separate stages around your own arrangement.
Use the support to adjust spacing
Treat this as a construction exercise for individual flower faces. Compare one supported section with the remaining spray before repeating the method throughout. The visible change comes from the position of each flower and the small support behind it. A closer layout may suit one design, while a more open spray may suit another; the video presents both without establishing a single correct spacing.
Choose wire and tape by their actual specifications
Match the wire’s flexibility and the tape’s handling to the flowers you are using. The footage shows a thin silver-colored wire and small tape strips, but it does not identify a stocked product, test adhesive performance or measure the effect on vase life. The blue appearance of the flowers is visible; whether that color is natural, dyed or otherwise treated is not established.
The Instagram tutorial
Watch the same demonstration on FAFAFLOWER’s Instagram.
Compare flower spacing in a complete arrangement
For a separate example of balancing flower heights and gaps in a container, see the full basket demonstration. Layered pink flower basket tutorial.
Original tutorial by 拂苏花艺课程 on Xiaohongshu, shared with permission. Original design and footage remain credited to the creator; FAFAFLOWER added the English visual steps. These written notes describe the visible process and are not a verbatim audio transcript.
