Wrapping Tutorials
Red Cylinder Flower Arrangement Tutorial: Pink, Orange and Burgundy
Oct
Last updated:
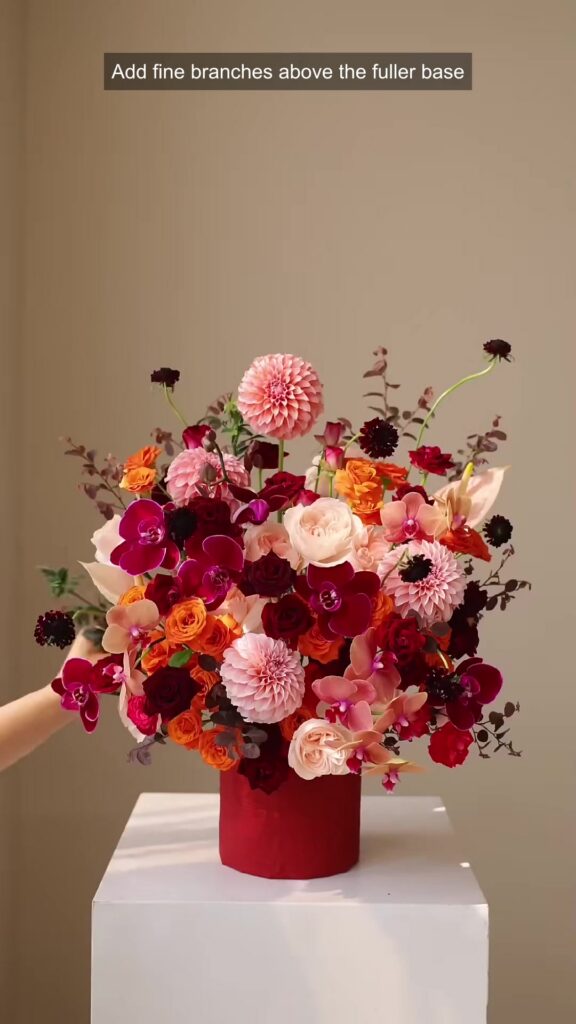
This red cylinder flower arrangement tutorial shows how a clear height structure becomes a fuller display through repeated color placement. A tall pink focal bloom establishes the first vertical line above an already-prepared red container. Pale flowers, low orange clusters and burgundy accents are then added at different heights, with branching stems completing the outline. The 33-second video is a condensed demonstration rather than a measured recipe. Use the player to follow the visible order, then pause at the stages below to compare the stem positions.
Materials shown in the demonstration
- A red cylindrical container with a fitted green insert already in place. The clip does not show the container lining, fastening method or water preparation.
- Pink rounded focal flower heads, paler clustered blooms, orange clusters, burgundy accents and bright pink/magenta flowers. Select actual flowers by their available size and stem behavior; exact varieties are not identified here.
- Fine branching stems, leafy accents and curved wiry stems for the final outline. Their visual placement is shown, but an exact stem count is not supplied.
- A stable working surface and support appropriate to the chosen stems. Check the actual container and insert specifications rather than assuming that the decorative container alone is watertight.
Follow the visible steps
- 00:00–00:03 — Establish the first vertical line The demonstrator begins with a single rounded pink flower on a long stem, placing it into the prepared green insert near the center. Its height becomes a reference for the stems that follow. Notice the amount of exposed stem at this early stage: the arrangement is deliberately open before the lower mass is built. The video does not measure the height, so compare the bloom with the actual container and the intended viewing position instead of treating this as a fixed proportion.
- 00:03–00:06 — Offset the next stems A darker red bloom and a pale flower are set away from the main vertical line. These side positions give the composition direction before the base becomes dense. Watch where each stem enters the insert and how the flower heads sit at different heights. Avoid interpreting every original number marker as a complete recipe: later additions are compressed into short cuts, so the visible markers do not establish a reliable total stem count.
- 00:06–00:10 — Connect the container to the flowers Orange clusters are placed low near the rim, and another rounded pink focal head appears to one side at a lower height than the first. This brings color close to the container while keeping the tallest bloom distinct. Compare the open spaces between the pink heads rather than lining all of them up at one level. The orange sections also repeat the warm color relationship introduced by the red container.
- 00:10–00:15 — Build the pale middle clusters Additional pale blooms are placed through the middle at staggered heights. The open framework gradually becomes a connected arrangement, but individual flower faces remain visible. Follow the changing outline on both sides of the cylinder. The short video does not show every stem cut or insertion in real time; pause to study the result of each change rather than assuming that an omitted preparation step is unnecessary.
- 00:15–00:20 — Repeat burgundy through the center Darker burgundy blooms are threaded between the pale and pink sections, with orange clusters expanding nearby. The contrast is distributed through the arrangement rather than left as one isolated dark patch. Check how the lower flowers connect visually to the red container. Different flower sizes will change how many additions are needed, so judge the visible spacing and color repetition instead of copying an unverified stem quantity.
- 00:20–00:24 — Complete the fuller lower outline Bright pink and magenta flowers extend across the lower and outer portions, while pale and orange faces still show between them. The lower mass becomes broader and more continuous, supporting the taller pink focal line above. View the front as a whole and check that a newly added bloom has not hidden the earlier focal flowers. The clip shows a decorative arrangement process; it does not establish a finished transport or display-care procedure.
- 00:24–00:33 — Finish with fine branches and inspect Fine branching foliage and curved stems rise beyond the fuller flower mass and soften its outer boundary. They add a different line quality from the rounded focal heads. The final shot presents a pair of related finished displays; it is a reference for the overall appearance rather than evidence that both were built in this single sequence. Compare the container, lower flower mass and light upper outline together before making further adjustments.
Adapt the structure to the actual container
The visible container and green insert are prepared before recording begins. If you use another vessel, resolve stability, fit and the appropriate water-handling method before following the decorative placement sequence. The video cannot verify those properties for a product in your own stock. A wider or lower container may call for a different first focal height and a broader lower outline. Work from the silhouette and the real stem behavior, making small changes and checking the front view between additions. Keep exact cutting lengths, flower counts and container dimensions in your own tested recipe rather than deriving them from a fast clip.
Repeat color without flattening the shape
The example combines pale pink and cream-colored faces with warmer orange clusters and deeper burgundy accents. The red cylinder participates in that color scheme instead of disappearing under wrapping. Notice that the colors repeat at different heights and depths: a similar color does not always occupy a matching position on the opposite side. Choose flowers with compatible visual scale for your own arrangement, and test their placement around the actual support. No particular material composition, container performance, flower variety, product SKU or current inventory is verified by this demonstration.
The Instagram tutorial
Watch the same demonstration on FAFAFLOWER’s Instagram.
Compare another shaped floral display
For a different outline built around a visible support, compare the base and color placement in the orange crescent floral design tutorial.
Original tutorial by 花隅手记 on Xiaohongshu, shared with permission. Original design and footage remain credited to the creator; FAFAFLOWER added the English visual steps. These written notes describe the visible process and are not a verbatim audio transcript.
