Wrapping Tutorials
Single-Sheet Bouquet Wrapping: Fold, Gather and Shape
Oct
Last updated:
A single sheet of wrapping paper can frame the same bouquet in several ways. In this short comparison, an already-made pink bouquet is placed against pale brown paper, and the florist changes the angle, folds the top edge, rolls the sides and gathers the paper near the stems. The video is a fast visual comparison rather than a measured cutting pattern. Pause between examples to study the outline before trying the next fold.
Materials shown in the demonstration
- One sheet of pale brown wrapping paper for each demonstrated wrapping attempt; its measurements and composition are not established.
- An already-made pink bouquet with green foliage; flower arrangement and stem preparation occur before the clip.
- Ribbon and a message card are visible on finished examples, but tying and card attachment are not shown.
Follow the visible steps
- 00:00–00:08 — Overlap the side panels Lay the bouquet across the paper with the flowers clear of the working edges. Bring the sides around the bouquet and overlap them toward the stem area. The completed example has a pointed outer outline and a narrow gathered waist. Keep the paper from pressing into the flowers; the clip does not provide a sheet size or a measured overlap.
- 00:08–00:13 — Change the paper angle The next example begins with a different paper orientation. Position the bouquet so the visible corners sit at different heights, then bring the sides together. Compare the finished raised points with the first silhouette. The aim is to see how placement changes the outline, rather than copy an unshown dimension.
- 00:13–00:21 — Roll the side edges The florist rolls the paper side edges inward, gathers the base and sets the bouquet against the shaped sheet. The completed wrap leaves the rolled edges standing beside the flowers. Hold the gathered area while adjusting the upper opening so the bouquet remains visible. The video cuts quickly between preparation and the finished result.
- 00:21–00:29 — Fold an upper edge A fresh setup shows an upper edge folded down before the bouquet is enclosed. Bring the side panels across and gather the lower paper near the stems. This produces a different top line from a fully pointed sheet. Check the overlap from the viewing side and keep the bouquet face open as the paper closes below it.
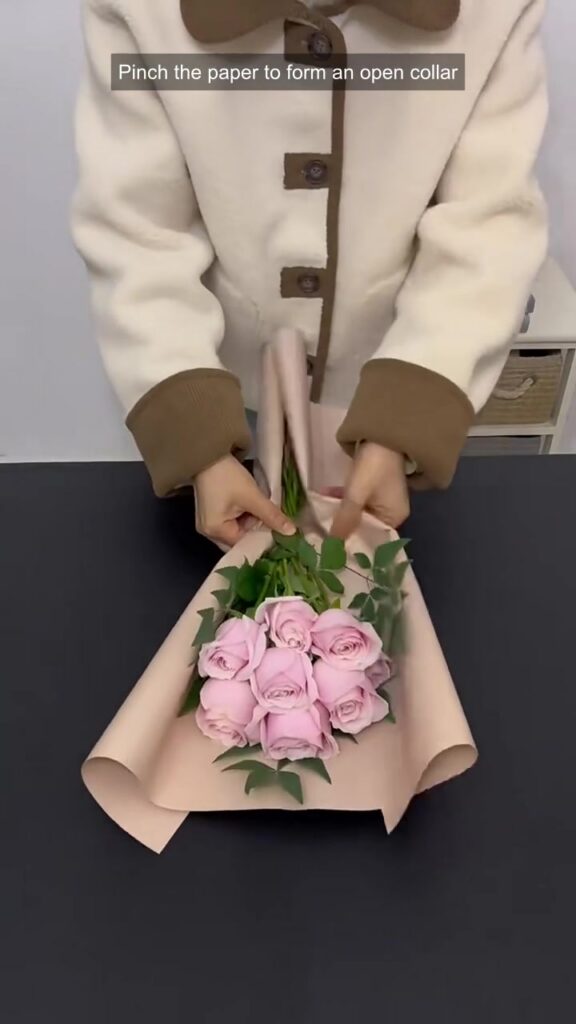
- 00:29–00:35 — Gather an open collar Pinch the paper toward the center, then place the bouquet against the gathered sheet. Open the upper folds around the flower heads and compare the wide collar with the earlier narrow cone. The finished examples include ribbon, but the knot itself is not taught in this clip.
- 00:35–00:44 — Compare another diagonal fold The last sequence changes the fold angle again, brings a side across the bouquet and gathers the paper at the stem area. The video ends during this shaping sequence; it does not show a separate final display of this attempt. Use it as another folding reference, rather than assume a missing finishing step.
Adapt the shape to your bouquet
Start with a sheet that comfortably reaches around your own prepared bouquet, then test the outline before securing it. A wide collar needs more room near the flowers than a narrow overlap. Adjust the bouquet position and paper angle in small steps, checking that foliage is not trapped beneath the folds. These are adaptations to test with your materials, not measurements supplied by the creator.
Choose the wrapping layers
The visible paper has a pale brown appearance. Its fiber, thickness, coating and resistance to moisture cannot be established from the footage. Choose paper suited to the weight and handling of your bouquet, and follow the material supplier’s specifications. Keep any necessary stem moisture protection appropriate to your own flowers; this clip does not demonstrate it.
Compare material options in the wrapping paper, lining paper and ribbon collections. These are related material categories; a specific listed product is not identified from the video.
The Instagram tutorial
Watch the same demonstration on FAFAFLOWER’s Instagram.
More wrapping references
Compare the panel order in our lavender layered wrapping tutorial, or read What Paper Do Florists Use? for material selection.
Original tutorial by 花园时光(花艺人) on Xiaohongshu, shared with permission. Original design and footage remain credited to the creator; FAFAFLOWER added the English visual steps. These written notes describe the visible process and are not a verbatim audio transcript.
